UI Effect Baking
Luna's UI Effect Baker is an editor tool that pre-renders a static effect stack into a PNG + 9-slice sprite, so authors can swap a runtime UI Effect (which costs roughly 3 SetPass per element) for a single background-image that batches like any other sprite. Same authoring DX, same look, one draw call per element.
The whole workflow in four lines:
- Author a preset — create a
UIEffectBakePreset, or snapshot a live element's effect stack straight from the Luna Effects window. - Bake — click Bake to Project; out comes a 9-slice PNG imported with the right sprite settings.
- Export USS — add the preset to a
UIEffectBakeUssCollectionand click Export USS; out comes a generated stylesheet with one ready-made class per preset. - Add the class —
class="luna-fx luna-fx-shadow-md"becomes a singleclass="bake-card-elevated". Same pixels, one batched draw call, no hand-written USS.
Why bake?
The runtime UI Effects filter is a great fit for elements whose look genuinely needs to change at runtime — hover/active states, dissolves, shines, palette swaps. For everything else — cards, panels, frames, framed portraits, fixed gradients — the filter pays full per-frame cost for pixels that never move.
| Approach | Batches | Element count | Reuse | Memory |
|---|---|---|---|---|
| Runtime filter | High (~3/el) | 1× | High | Low |
Atomic PNGs stacked (shadow.png + border.png + …) | OK | 2–4× | High | Medium |
| Per-element bake | Low | 1× | None | High |
| Style-preset bake | Low | 1× | High | Low |
A baked style-preset PNG is shared across every instance of that style. Multiple cards using the same card-elevated look batch together — often better than the runtime path because UITK can fold them into a single draw call.
When to bake vs. keep the filter
| Treatment | Use a bake | Use the runtime filter |
|---|---|---|
| Cards, panels, frames, fixed-color glow / shadow | Yes | No |
| Static gradient fills | Yes | No |
| Inner-overlay rim, fixed outline color | Yes | No |
| Hover / active / disabled state transitions | No | Yes (state tween writes live uniforms) |
| Shine, flash, dissolve, tile scroll, marching dashes, circling outline | No | Yes |
| Per-instance USS variable overrides | No | Yes |
💡 Rule of thumb: bake what never changes. If the visual is the same every frame and never reacts to USS state, it's a bake candidate — one draw call, no per-frame filter cost. Otherwise leave it on the runtime filter.
Design philosophy
Bake style composites, not atomic effects
Don't bake shadow-md.png, glow-lg.png, border-1.png separately and stack three sprites per element. Bake named composites that combine the full effect stack into one PNG per look:
card-elevated→ one baked PNG (shadow + border + rounded corners)button-primary→ one baked PNG (gradient + inner shadow + border)panel-glass→ one baked PNG (gradient + edge highlight + border)
One element, one draw call, full effect stack. Composite PNGs reuse across every instance of that style.
9-slice is the foundation
Bake each composite at a reference size with padding for the largest glow/outline radius, then mark 9-slice borders so the center stretches without distorting edges. One bake handles every element size as long as the effects are edge or radially uniform — drop shadows, borders, rounded corners, edge glows, inner shadows all qualify.
What doesn't 9-slice cleanly
- Full-element gradients, noise, distortions — bake a few canonical aspect ratios and pick the nearest, or accept a small atlas per style.
- State variants (hover/focus/pressed/disabled) — bake as separate textures, swap on state. Do not drop back to runtime shaders just for states.
- Theming / dynamic color — preferred: bake neutral, tint at runtime via vertex color (still batches when material is shared). Alternative: bake per theme if you only have two or three.
Animated effects are excluded by design
Shine, Flash, Dissolve, Tile, OutlineCirclingSpeed, OutlineShineSpeed are intentionally not baked — a single-frame snapshot would mislead the author. The dashCount parameter on outline is preserved (static dashes bake correctly) but the per-frame speed offset stays at zero.
If the element needs animation, leave it on the runtime filter.
Watch out for
- Atlas bloat from color variants. Tint at runtime instead of baking
card-blue,card-green,card-red. - Text effects. UI Toolkit text doesn't compose cleanly with baked backgrounds — keep text-specific shaders or use SDF for text shadows.
- Blur padding. Bake with enough transparent padding around the content rect for the largest glow/outline radius, or edges clip when 9-sliced.
- Reference size. Too small → upscaling artifacts. Too large → wasted memory. Pick based on the largest realistic usage of each style.
- Scaled panels. On Constant Pixel Size panels with Scale > 1, a 1× bake renders soft. Set the preset's Resolution Scale to the panel scale — see Generated USS & the bake underlay.
Quick start
The same preset, baked and dropped onto its live element in the showcase — one batched draw call, no runtime filter:
-
Create a preset. Right-click in the Project window → Create → CupkekGames → Luna UI → UI Effect Bake Preset. Or click Export in the Luna Effects window (Tools → CupkekGames → Luna Effects) to snapshot a live element straight into a preset.
-
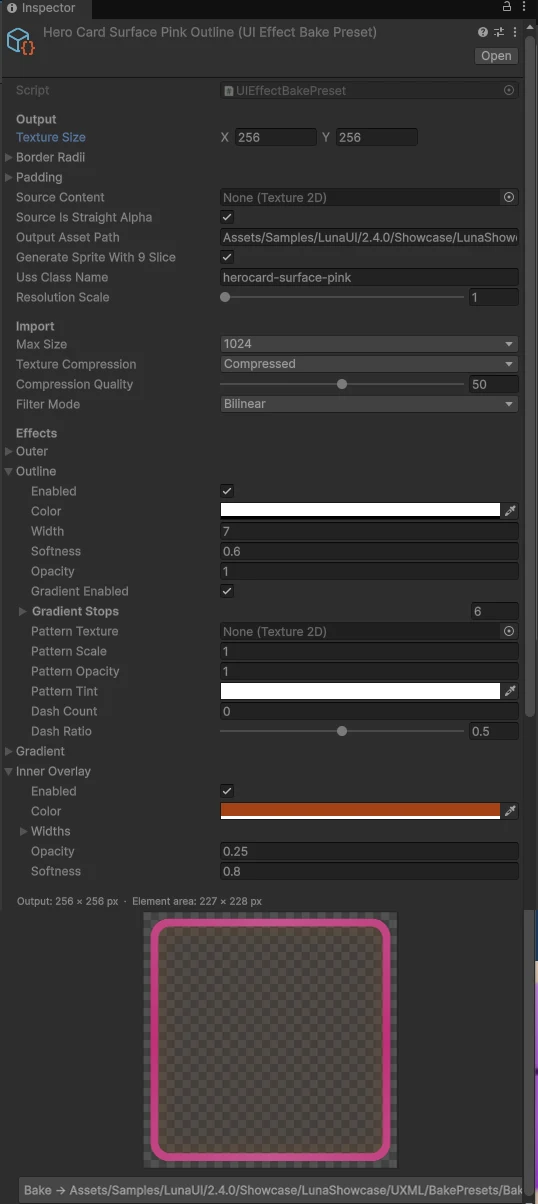
Select the preset asset. Its inspector has the live preview, validation banners, and the Bake button.
-
Set the output geometry.
- Texture Size — exported dimensions in layout pixels; square by default (
256 × 256) since the 9-slice center stretches to any element aspect at apply-time. The output PNG istextureSize × Resolution Scale. - Border Radii — corner radii in pixels, in the runtime convention (TL, TR, BR, BL).
- Padding — margin around the element in pixels (L, T, R, B). Must be at least as large as the widest
outer.width/outline.width, otherwise the glow/shadow gets clipped at the edge of the texture. The inner drawable element istextureSize − paddingon each side. - Resolution Scale — texel-density multiplier; match your PanelSettings scale (e.g.
2for Constant Pixel Size × 2). Layout sizes don't change — the generated USS compensates with-unity-slice-scale. - Uss Class Name — the class suffix the USS export emits (
card-elevated→.bake-card-elevated). This one class is both the marker and the texture name — no second class to type.
- Texture Size — exported dimensions in layout pixels; square by default (
-
Toggle effects and author parameters. Outer, Outline, Gradient, Inner Overlay. The live preview re-renders on every field change.
-
Bake. Click Bake to Project — the tool writes the PNG and reimports it with the right sprite settings, including the 9-slice border.
-
Export the USS. Create a collection (Create → CupkekGames → Luna UI → UI Effect Bake USS Collection), add your presets, click Export USS (or Bake All + Export USS to refresh every PNG first). The collection fully owns its output file — every export is a clean rewrite, and re-baking a preset from its own inspector re-exports any collection that contains it, so the stylesheet can't go stale.
-
Import the generated file once from your theme
.tss:css@import url("/Assets/UI/Baked/LunaBakedEffects.uss"); -
Swap classes on elements.
xml<!-- before: runtime filter, ~3 SetPass --> <engine:VisualElement class="luna-fx luna-fx-shadow-md luna-fx-clay sky"/> <!-- after: baked underlay, batches like any sprite --> <engine:VisualElement class="bake-card-elevated"/>
Import settings
The preset's Import section stamps the baked PNG's importer settings, so you don't hand-tune every texture after baking:
| Field | Default | Notes |
|---|---|---|
| Max Size | 1024 | Importer cap; only ever downscales — a smaller bake imports at its own size. Raise for large surfaces, lower to hard-cap memory. |
| Texture Compression | Compressed (Normal Quality) | Uncompressed keeps soft gradients / alpha edges crispest; CompressedHQ trades memory for fewer artifacts. |
| Compression Quality | 50 | Materially applies only to Crunched / HQ formats; ignored when Uncompressed. |
| Filter Mode | Bilinear | Point for pixel-exact bakes. |
What gets baked
The baker runs the bake variant of the same Luna uber filter the runtime uses (Hidden/Luna/UberFilter_Bake). The shader includes the same effect math files (LunaCommon, LunaSDF, LunaOuter, LunaOutline, LunaGradient, LunaInnerOverlay), so the bake matches the runtime pixel-for-pixel modulo expected sub-pixel differences from the lack of atlas resampling.
The preset surfaces a static subset of each runtime effect:
| Section | What you author | What's omitted |
|---|---|---|
| Outer | color, strength, edge spread, offset, width, optional gradient stops | — |
| Outline | color, width, softness, opacity, optional gradient stops, optional pattern texture (scale / opacity / tint), dash count + ratio | Marching-ants speed, circling speed, traveling shine |
| Gradient | linear/radial, angle, opacity, reverse, color bias, stops | — |
| Inner Overlay | color, per-edge widths, opacity, softness | — |
Live-export from a UIEffectElement (via the Luna Effects window) writes the resolved uniform values from the on-screen element directly into the preset — capturing whatever the user sees, including --luna-fx-* overrides from tier classes, hover state, and theme tokens.
9-slice border math
The baker keeps every decorative band inside the corner region so the center stretches without distorting glow / outline / radii:
ring   = max(outer.width, outline.width)          // whichever of the two is enabled
// |outer.offset.*| is added only when the Outer effect is enabled
left   = (padding.L + max(TL_radius, BL_radius) + ring + |outer.offset.x|) × ResolutionScale
top    = (padding.T + max(TL_radius, TR_radius) + ring + |outer.offset.y|) × ResolutionScale
right  = (padding.R + max(TR_radius, BR_radius) + ring + |outer.offset.x|) × ResolutionScale
bottom = (padding.B + max(BL_radius, BR_radius) + ring + |outer.offset.y|) × ResolutionScale
If textureSize minus these borders is ≤ 0 on either axis, the inspector shows a warning. Either grow textureSize (more stretchable middle), or shrink padding / radii / outer / outline widths until a positive center remains.
The output PNG dimensions are exactly textureSize × ResolutionScale. The sprite border — in the order (left, bottom, right, top) — is set on import.
Color space & alpha
Two GPU gotchas are handled inside the baker so the output is drop-in ready:
- Linear projects.
SetVectorArraydoes not auto-linearize colors, soApplyStopscallsColor.linearon every gradient stop before packing. Flat-color uniforms (_OutlineColor,_OuterColor,_InnerOverlayColor) go throughMaterial.SetColor, which Unity linearizes correctly. The outputRenderTextureusesRenderTextureReadWrite.sRGBin Linear projects, so the GPU runs linear → sRGB on store and the PNG ends up gamma-encoded — ready to import back as an sRGB sprite. - Premultiplied → straight alpha. The filter pipeline operates in premultiplied alpha throughout. The bake renders premultiplied, then converts back to straight alpha before
EncodeToPNG. UITK sprites expect straight alpha — without this conversion, RGB values get "burned" (multiplied twice when UITK re-premultiplies during composite).
When you assign a straight-alpha PNG as the preset's sourceContent, leave sourceIsStraightAlpha = true. The shader premultiplies on sample so it composites with the rest of the pipeline. Captures from another bake (already premul) should set this to false.
Export from a live element
In the Luna Effects editor window, every tracked UIEffectElement has an Export button. Click it to snapshot the currently-rendering state — including all USS-resolved --luna-fx-* values — into a fresh UIEffectBakePreset asset.
The exporter reads each uniform back from a MaterialPropertyBlock after the same ApplyToMPB + ApplyOverrides pipeline the runtime uses, so the preset captures exactly what's on screen. Animated state is intentionally dropped (the preset is a static snapshot).
Use this when iterating in-scene with USS until the look is right, then export → bake → add to a collection. The exporter pre-fills geometry from the live element (size, radii, required padding), suggests Uss Class Name from the element's first tier class (luna-fx-shadow-md → shadow-md), and defaults Resolution Scale from the panel's effective scale. The snapshot geometry is squared to the nearest even side, so the 9-slice center and -unity-slice-scale stay seam-free.
Generated USS & the bake underlay
The live filter draws outside the element rect — that's what the preset's padding is for — but a background-image clips to the rect, so a naive class swap visibly shrinks the effect. The generated USS solves this with a one-child indirection:
-
Every element carrying a
bake-<name>class gets one auto-injected underlay child (bake-underlay): absolutely positioned, picking-ignored, painted behind the element's content.LunaUIManagerinstalls the driver on every UIView automatically (the same Auto-Install Fx toggle as the runtime filter); manual control viaUIEffectBakedDriver.Install(root). Detection matches thebake-class prefix; there's also a barebakemarker for the rare case where the styling class is added from C# at runtime and the driver needs a static hook to find the element. -
Each exported preset becomes one rule targeting that child, re-creating the filter's overhang with negative offsets equal to the bake padding:
css.bake-card-elevated > .bake-underlay { left: -16px; top: -16px; right: -16px; bottom: -16px; background-image: url("./BakedPNG/card-elevated.png#card-elevated"); -unity-slice-scale: 0.5; /* present only when the asset is a sprite AND Resolution Scale ≠ 1 */ }
The url() is stylesheet-relative, resolved against the .uss file's own folder — not a project://database GUID reference — so the generated sheet and its baked textures move together and round-trip identically between the authoring tree and any imported copy. The exact relative prefix (./BakedPNG/…, ../…) depends on where the collection writes its .uss versus its textures. The trailing #card-elevated fragment selects the 9-slice Sprite sub-asset (which carries the border) rather than the plain Texture2D.
The driver never reads custom properties or assigns visuals from C# — the generated USS is the single source of truth, so theme swaps and selector tricks behave exactly like hand-written styles.
Rules that keep it predictable:
- One class is enough — and only one.
bake-<name>is both the marker and the texture name, so you never type a second class. Twobake-<name>classes on one element would fight over the single underlay — bake a composite preset instead (see design philosophy above). - Mixing with the runtime filter is supported. Keep
luna-fxplus an animated tier (shine, dissolve) alongside abake-<name>static surface; the two systems are independent. - Layering matters. The underlay paints behind the element's own children, so where a bake sits in the hierarchy decides whether it overhangs, gets clipped, or frames on top — see Structuring the UXML below.
- Scaled panels. Set Resolution Scale to your PanelSettings scale: the bake renders at that texel density and the generated
-unity-slice-scalebrings slices back to layout size — crisp instead of soft. Live-element exports default this from the panel automatically. - Quiet failure modes. A
bake-<name>class whose generated rule is missing (or whose.ussisn't imported) leaves an invisible zero-size underlay; a barebakemarker with no matching rule shows nothing. Neither throws.
Structuring the UXML
Which effect goes on which element. A bake's underlay is injected at child-index 0, so it paints behind the host element's own children. Three rules follow, and every baked surface in the Showcase obeys them:
- Put content in child elements, never on the baked host itself. The underlay paints over the host's own
background-imageand text — a baked element's own image/text would be hidden behind it. Icons, labels and sprites go in child elements, which paint after the underlay. - One underlay per element. You can bake the whole stack — shadow + fill + outline — into one composite preset on a single element; that's the recommended default (see Design philosophy). Split into separate elements only when a piece is baked on its own and has to paint over the content: a standalone outline / ring goes on a top child so it frames the content instead of being hidden behind it.
- A shadow / glow needs an opaque layer above it. A baked drop shadow's dark inner half is meant to be hidden by the body it sits behind — if only transparent content sits above the underlay, that inner half washes across the element. Put an opaque fill (a filled child, or a fill bake) above the shadow; this is why chat bubbles carry
bake-coral-shadowon a surface with a separate opaque__fillchild.
The effect → layer map
| Baked effect | Put it on | overflow | Why |
|---|---|---|---|
| Drop shadow · outer glow | the root (or the content element it surrounds) | none (must overhang) | the underlay spills past the box; clipping would eat the shadow's / glow's whole point |
| Gradient fill (or a flat background) · inner shadow / rim | an absolute-fill child (…__surface) | overflow: hidden (+ border-radius) | clips the fill to the panel shape and contains the inner effects |
| Outline · ring | a top child, above the fill | none | frames on top, un-clipped; the ring's rounded shape is baked into its own sprite (no border-radius needed) |
| State-swapped fill (control internals) | the target element, via direct background-image | clipped by its parent | swaps by state class — see Direct application below |
Here "fill" means the Gradient effect — a flat, linear, or radial background baked into the panel — or just the element's own background-color showing through; it isn't a separate effect of its own.
DOM order = paint order: root underlay (shadow) → fill child → content → outline child. A separately-baked outline can't sit on the root — it lives at the border (half in, half out), and the opaque fill child would bury its inner half into a thin sunk-in ring, so it belongs on a top child. An outer glow is an outer effect like the shadow: it paints behind whatever it surrounds — the whole root surface, or a single content element such as an icon.
Keeping the root a plain flex container (shadow only) leaves your flexbox layout and any nested controls untouched — the fill rides on a
position: absolutechild that fills the box without joining the layout. Andoverflow: hiddenon an element clips its own underlay's overhang, so never put a shadow / glow bake on a clipped element.
The canonical skeleton
Every clay surface in the sample — StatRow, ItemTile, JourneyTierRow's reward tile — is this shape:
<!-- ROOT · drop shadow · plain flex container · NO overflow so the shadow overhangs -->
<ui:VisualElement class="stat-row bake-coral-shadow">

    <!-- FILL CHILD · background · absolute-fill · overflow:hidden + radius rounds the square bake -->
    <ui:VisualElement class="stat-row__surface bake-light-bg" picking-mode="Ignore" />

    <!-- CONTENT · real children, painted on top of the fill underlay -->
    <ui:VisualElement class="stat-row__icon" />
    <ui:Label class="stat-row__value" text="128" />
</ui:VisualElement>.stat-row { position: relative; } /* bake-coral-shadow → drop shadow */
.stat-row__surface { position: absolute; top: 0; left: 0; right: 0; bottom: 0;
border-radius: var(--radius-md); overflow: hidden; } /* bake-light-bg → fill */Recipe · orb + rarity ring (AvatarPic)
A fill child (the orb, clipping its art) plus a top child (the ring, whose round shape is baked into the sprite):
<ui:VisualElement class="avatar-pic">
    <ui:VisualElement class="avatar-pic__bg bake-bg-blue-bake" picking-mode="Ignore">   <!-- fill child -->
        <ui:VisualElement class="avatar-pic__art" picking-mode="Ignore" />               <!-- art, clipped by __bg -->
    </ui:VisualElement>
    <ui:VisualElement class="avatar-pic__ring bake-rarity-ring-epic" picking-mode="Ignore" />  <!-- top child -->
</ui:VisualElement>
Rounding a bake
Two ways to get rounded corners — usually you want the first:
- Bake the corners round. Set the preset's Border Radii; the SDF rounds the shape at bake time and 9-slice keeps those corners crisp at any element size. No clipping needed.
- Clip with a container —
border-radius+overflow: hidden. Reach for this when a flat / square texture has to be reshaped (e.g. a direct-path fill that's stretched rather than 9-sliced) or when one texture is reused at different radii per state. Put the radius on the element itself if the fill is that element (…__surface), or on the parent if the fill is a child swapped by state — milestone nodes do the latter:.journey-tier__nodecarries the radius + overflow,.journey-tier__node-fillcarries the texture.
When the class is added at runtime — the bare bake marker
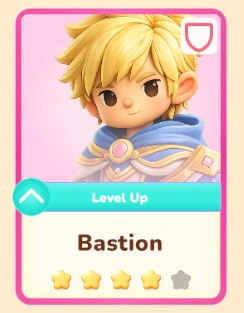
If a controller sets the bake-<name> class from C# (per rarity, per state), author the element with the bare bake marker so the driver attaches the underlay before the real class arrives. HeroCard and ItemTile do exactly this:
<ui:VisualElement class="hero-card__surface bake"> … </ui:VisualElement>// HeroCardSlotController, on rarity change:
surface.AddToClassList($"bake-herocard-surface-{rarity}"); // shadow + outline + inner-rim compositeThe fuller worked examples (clay surfaces, avatar orb + ring, per-tier rings) ship in the README.md under Samples~/Showcase/LunaShowcase/UXML/BakePresets/.
Direct application
For control internals and state-driven fills. The underlay driver is for whole decorated elements. Some targets can't take an injected child — a control's internal parts (a progress-bar fill, a list row) or an element whose fill is swapped by state. For those, skip the driver and set background-image on the target selector yourself. The Showcase does this in two places:
/* Progress-bar fill — ProgressBarBaked.uss */
.progress-bar--baked-coral .ProgressBar__progress-element {
    background-image: url("BakedPNG/progress-fill-coral.png");
}

/* Milestone node fill, swapped by row state — JourneyTierRow.uss */
.journey-tier--completed .journey-tier__node-fill {
    background-image: url("../../BakePresets/BakedPNG/teal-bg.png");
}
.journey-tier--current .journey-tier__node-fill {
    background-image: url("../../BakePresets/BakedPNG/gold-bg.png");
}
Direct-path URLs bind the plain Texture2D — note there is no #fragment — which stretches uniformly, exactly what a solid fill wants. Add #name only if a direct-path element genuinely needs the 9-slice sprite. You own the placement: no marker, no injected underlay, no generated USS.
File map
| File | Purpose |
|---|---|
Editor/Shaders/LunaUberFilter_Bake.shader | Blit-compatible variant of the runtime uber filter |
Editor/EffectBaker/UIEffectBakePreset.cs | ScriptableObject + per-effect serializable configs |
Editor/EffectBaker/LunaEffectBaker.cs | Static RenderToRT / RenderToTexture / BakeToAsset API |
Editor/EffectBaker/UIEffectBakePresetEditor.cs | Custom inspector + live preview pane |
Editor/EffectBaker/UIEffectStackExporter.cs | Snapshot a live UIEffectElement into a fresh preset |
Editor/EffectBaker/UIEffectBakeUssCollection.cs | Preset list + output path — owns one generated .uss file |
Editor/EffectBaker/LunaBakedUssWriter.cs | Validation, USS text generation, export |
Editor/EffectBaker/UIEffectBakeUssCollectionEditor.cs | Collection inspector — validation readout + export buttons |
Runtime/Scripts/Effects/UIEffectBakedDriver.cs | bake-<name> / bake class → underlay-child injection |
Roadmap
- Sprite-sheet baking — N frames at intervals into a single texture for animated effects (outline shine, dissolve, tile). Would need re-including the animated shader includes in the bake variant and a frame-stepping driver in the baker.
- State variants in one preset — bake hover / active / disabled poses to suffixed assets in a single click; the generated-USS shape already supports
:hoverselectors. - Zero-touch substitution — resolve an element's
--luna-fx-*signature against a baked library at attach time and swap automatically, so even the class edit disappears.
See also
- UI Effects — the runtime system being baked; everything animated or state-driven stays there.
- Colors — palette tooling; bake neutral and tint at runtime instead of baking per-color variants.
The Effect Baker ships with Luna — get it on the Asset Store.
Settings
Theme
Light
Contrast
Material
Dark
Dim
Material Dark
System
Sidebar(Light & Contrast only)
Font Family
DM Sans
Wix
Inclusive Sans
AR One Sans
Direction