UI Render
Put live 3D characters, particle systems and VFX Graph effects inside your menus — a spinning character in the inventory, GPU sparks bursting over a button, a rotating reward chest in a modal. Any 3D content renders directly onto any UI Toolkit element; Luna handles the cameras, render textures, pooling, and cleanup for you.
The whole API in two lines — drop a RenderElement in your UXML, play a prefab on it:
<CupkekGames.Luna.RenderElement name="MyRender" RenderWidth="512" RenderHeight="512" />UIRenderHandle handle = root.Q<RenderElement>("MyRender").Play(myCharacterPrefab);Scene setup (a dedicated layer + two manager components) is covered in the Quick Start below; how the pipeline works under the hood is in the Architecture Overview.
Features
- Pooled Architecture: Pre-warmed pool of Camera + RenderTexture slots with automatic grow/shrink
- Multiple Content Modes: Prefab instantiation, scene instance borrowing, and in-place observation
- RenderElement: Custom VisualElement with built-in render resolution and convenience API
- PlayOverlay: Layer 3D effects on top of existing UI elements without replacing their visuals
- PlayOverlayInstance: Overlay with an existing scene instance instead of a prefab copy
- Overlay Anchoring: Position overlays at 9 anchor points within the parent element
- Handle Replay: Re-instantiate content in the same slot without pool churn
- Pluggable Effect Handlers: Strategy pattern for particle, VFX, and custom effect lifecycle tracking
- Auto-Release: Slots automatically return to pool when effects finish playing
- Camera Controls: Auto-framing, runtime camera/content transforms, orthographic and perspective modes
- Debug Tools: RT-to-PNG export, detailed logging of camera, bounds, and slot state
Quick Start
Setup
- Create a dedicated layer: run Tools > CupkekGames > Setup UIRender Layer (names layer 31
UIRender), or name one manually in Edit > Project Settings > Tags and Layers - Add
UIRenderManagerto a GameObject in your scene - Make sure a
LunaUIManageris also in the scene — it drivesUIRenderManager's per-frame tick (see UIRenderManager) - Configure pool settings in the Inspector
Using RenderElement (Recommended)
Add a RenderElement to your UXML:
<CupkekGames.Luna.RenderElement
name="MyRender"
RenderWidth="512"
RenderHeight="512" />Play a prefab on it from code:
RenderElement renderElement = root.Q<RenderElement>("MyRender");
UIRenderHandle handle = renderElement.Play(myParticlePrefab);

// Stop effects (auto-releases when particles drain)
handle.Stop();

// Or release immediately
handle.Release();
Here root is the visual tree delivered asynchronously by your PanelRenderer's reload callback, or the root passed to UIViewComponent.OnUILoaded(root) — see the examples below.
Using Any VisualElement
You can render onto any VisualElement using the manager API directly:
VisualElement target = root.Q<VisualElement>("MyElement");
UIRenderHandle handle = UIRenderManager.Instance.Play(myPrefab, target);
Architecture Overview
┌─────────────────────────────────────────────────────────┐
│                    UIRenderManager                       │
│              (Singleton, pool owner)                     │
├─────────────────────────────────────────────────────────┤
│                                                         │
│  ┌──────────────┐   ┌──────────────┐   ┌────────────┐  │
│  │ UIRenderSlot  │   │ UIRenderSlot  │   │    ...     │  │
│  │  Camera + RT  │   │  Camera + RT  │   │            │  │
│  └──────┬───────┘   └──────┬───────┘   └────────────┘  │
│         │                  │                            │
│         ▼                  ▼                            │
│  ┌──────────────┐   ┌──────────────┐                   │
│  │UIRenderHandle│   │UIRenderHandle│  ← caller-facing  │
│  └──────┬───────┘   └──────┬───────┘                   │
│         │                  │                            │
└─────────┼──────────────────┼────────────────────────────┘
          ▼                  ▼
   ┌─────────────┐    ┌─────────────┐
   │RenderElement│    │VisualElement│
   │(custom VE)  │    │(any element)│
   └─────────────┘    └─────────────┘
The pipeline is pooled Camera → RenderTexture → UI Toolkit: each UIRenderSlot contains an isolated Camera rendering to its own RenderTexture on a dedicated layer, and the texture lands on your element as its background. The UIRenderHandle is the caller-facing API for stopping, releasing, and adjusting the render at runtime.
Content Modes
The system uses a strategy pattern for content lifecycle. Each mode determines how content is placed into a render slot and what happens on release.
Prefab Mode (Play)
Instantiates a copy of the prefab into the render slot. The copy is destroyed on release. Safe for auto-destroy particles.
// Via RenderElement
handle = renderElement.Play(prefab, settings);

// Via Manager
handle = UIRenderManager.Instance.Play(prefab, target, settings);
Instance Mode (PlayInstance)
Borrows an existing scene GameObject by reparenting it into the render slot and changing its layer. The original parent, position, rotation, scale, and layer are restored on release. The object is not destroyed.
// Via RenderElement
handle = renderElement.PlayInstance(sceneObject, settings);

// Via Manager
handle = UIRenderManager.Instance.PlayInstance(sceneObject, target, settings);
Observe Mode
Watches a scene GameObject in-place without moving, reparenting, or changing its layer. A camera is positioned to render the object where it sits and follows it every frame.
// Via RenderElement
handle = renderElement.Observe(sceneObject, settings);

// Via Manager
handle = UIRenderManager.Instance.Observe(sceneObject, target, settings);
Activate (Generic)
Uses whatever content mode is configured in UIRenderSettings.ContentMode. Useful when the mode is set via the Inspector on a serialized UIRenderSettings asset.
handle = renderElement.Activate(content, settings);PlayOverlay
PlayOverlay renders 3D effects as an overlay on top of an existing UI element — without replacing the element's background. This is ideal for layering particle effects over icons, buttons, or cards.
How It Works
- A transparent child
VisualElementis created inside the target element (positioned at the configured anchor) - The RenderTexture is applied to this overlay child — the original element's visuals remain untouched
- The overlay's
aspect-ratiois set from the RenderTexture dimensions to prevent stretching - When the handle is released, the overlay is automatically removed from the hierarchy
Basic Usage
// Default: 100% size, centered, aspect-ratio preserved
UIRenderHandle handle = UIRenderManager.Instance.PlayOverlay(effectPrefab, myIcon);

// Via RenderElement (independent of main render handle)
UIRenderHandle overlayHandle = renderElement.PlayOverlay(effectPrefab);
PlayOverlayInstance
PlayOverlayInstance works like PlayOverlay but borrows an existing scene GameObject instead of instantiating a prefab copy. The instance is reparented into the render slot and restored to its original parent on release.
// Overlay an existing scene object onto a UI element
UIRenderHandle handle = UIRenderManager.Instance.PlayOverlayInstance(
    existingParticleSystem,
    myIcon,
    settings,
    overlaySettings
);
// On release, the instance is returned to its original parent — not destroyed
Custom Size
UIOverlaySettings settings = new UIOverlaySettings
{
    Width = Length.Percent(50),
    Height = Length.Percent(50)
};
UIRenderHandle handle = UIRenderManager.Instance.PlayOverlay(effectPrefab, myIcon, overlaySettings: settings);
Custom Position
UIOverlaySettings settings = new UIOverlaySettings
{
    OffsetX = new Length(30, LengthUnit.Pixel),
    OffsetY = new Length(-20, LengthUnit.Pixel)
};
UIRenderHandle handle = UIRenderManager.Instance.PlayOverlay(effectPrefab, myIcon, overlaySettings: settings);
Without Aspect Ratio
UIOverlaySettings settings = new UIOverlaySettings
{
    PreserveAspectRatio = false
};
Overflow Visible
By default, the overlay is clipped by the parent element's overflow USS property. If the overlay (especially with PreserveAspectRatio) is larger than the parent bounds, it will be cut off. Set OverflowVisible to automatically switch the parent's overflow to Visible while the overlay is active. The original overflow value is restored when the handle is released.
UIOverlaySettings settings = new UIOverlaySettings
{
    OverflowVisible = true
};
UIRenderHandle handle = UIRenderManager.Instance.PlayOverlay(effectPrefab, myElement, overlaySettings: settings);
// When handle.Release() is called, the parent's overflow is restored to its original value.
UIOverlaySettings Reference
| Property | Type | Default | Description |
|---|---|---|---|
Width | Length | 100% | Overlay width relative to parent |
Height | Length | 100% | Overlay height relative to parent |
OffsetX | Length | 0 | Horizontal offset from anchor position |
OffsetY | Length | 0 | Vertical offset from anchor position |
PreserveAspectRatio | bool | true | Lock overlay aspect ratio to RenderTexture dimensions |
OverflowVisible | bool | false | Set parent element's overflow to Visible while overlay is active. Restores original value on release |
Anchor | OverlayAnchor | Center | Anchor position within the parent element |
OverlayAnchor
The OverlayAnchor enum controls where the overlay is positioned relative to its parent:
| Value | Position |
|---|---|
Center | Centered (default) |
TopLeft | Top-left corner |
TopCenter | Top edge, centered |
TopRight | Top-right corner |
MiddleLeft | Left edge, vertically centered |
MiddleRight | Right edge, vertically centered |
BottomLeft | Bottom-left corner |
BottomCenter | Bottom edge, centered |
BottomRight | Bottom-right corner |
OffsetX and OffsetY are applied as margin offsets on top of the anchor position.
UIOverlaySettings settings = new UIOverlaySettings
{
    Anchor = OverlayAnchor.TopRight,
    Width = Length.Percent(60),
    Height = Length.Percent(60),
    OverflowVisible = true
};
UIOverlaySettings Builder
Use the fluent Builder for cleaner creation:
UIOverlaySettings settings = new UIOverlaySettings.Builder()
    .WithSize(50, LengthUnit.Percent)
    .WithAnchor(OverlayAnchor.TopRight)
    .WithOffset(10f, -5f)
    .WithOverflowVisible(true)
    .WithPreserveAspectRatio(true)
    .Build();
Builder Methods
| Method | Description |
|---|---|
WithWidth(Length) | Set overlay width |
WithWidth(float, LengthUnit) | Set overlay width with unit |
WithHeight(Length) | Set overlay height |
WithHeight(float, LengthUnit) | Set overlay height with unit |
WithSize(float, LengthUnit) | Set both width and height to the same value |
WithSize(float, float, LengthUnit) | Set width and height separately |
WithOffsetX(Length) / WithOffsetX(float) | Set horizontal offset |
WithOffsetY(Length) / WithOffsetY(float) | Set vertical offset |
WithOffset(float, float) | Set both offsets at once |
WithAnchor(OverlayAnchor) | Set the anchor position |
WithPosition(Length x, Length y) | Center the overlay at an exact point of the target (e.g. Length.Percent(52), Length.Percent(40)) — overrides the anchor. Use this for percent placement on both axes: offsets apply as margins, and margin percentages resolve against the parent's width only. |
WithPreserveAspectRatio(bool) | Toggle aspect ratio preservation |
WithOverflowVisible(bool) | Toggle overflow visibility |
You can also modify existing settings:
UIOverlaySettings modified = existingSettings.ToBuilder()
    .WithAnchor(OverlayAnchor.BottomCenter)
    .Build();
SerializedOverlaySettings
SerializedOverlaySettings is an Inspector-serializable class that mirrors UIOverlaySettings. Use it as a [SerializeField] on any MonoBehaviour or ScriptableObject to configure overlay settings from the Inspector. Call Build() at runtime to produce a UIOverlaySettings instance.
[SerializeField] private SerializedOverlaySettings _overlaySettings;

void Start()
{
    UIOverlaySettings settings = _overlaySettings.Build();
    UIRenderManager.Instance.PlayOverlay(prefab, target, renderSettings, settings);
}
Serialized Fields
| Field | Type | Default | Description |
|---|---|---|---|
Anchor | OverlayAnchor | Center | Anchor position within the parent element |
Size Unit | LengthUnit | Percent | Unit for width and height (Percent or Pixel) |
Width | float | 100 | Overlay width in the configured unit |
Height | float | 100 | Overlay height in the configured unit |
Offset X | float | 0 | Horizontal offset from anchor (pixels) |
Offset Y | float | 0 | Vertical offset from anchor (pixels) |
Preserve Aspect Ratio | bool | true | Lock aspect ratio to RenderTexture dimensions |
Overflow Visible | bool | false | Set parent overflow to Visible while overlay is active |
Convenience presets
Four named-preset methods on UIRenderManager wrap PlayOverlay with common settings combinations. Each replaces a ~10-line builder-chain at the call site with a one-liner.
PlayBurst — fire-and-forget center burst
public UIRenderHandle PlayBurst(
    VisualElement target,
    GameObject prefab,
    float size = 160f,
    OverlayAnchor anchor = OverlayAnchor.Center,
    Vector2 offset = default);
One-shot particle burst overlaid on target. The slot auto-returns to the pool when the ParticleSystem drains; a 5-second timeout guards against stuck slots. Use for level-up flares, currency-pickup bursts, on-click confetti — any single fire-and-forget effect that needs to spill outside the target's bounds.
// On a confirm button click — fire a coin burst:
UIRenderManager.Instance.PlayBurst(targetIcon, _coinBurstPrefab, size: 320f);
Internally equivalent to PlayOverlay with auto-release: true, auto-release timeout: 5s, render-mode: Continuous, overflow-visible: true, preserve-aspect-ratio: true.
PlayBurst also powers the UI Attractor reactions FX hooks: assign a one-shot ParticleSystem prefab to BurstFx / AllArrivedFx on a UIAttractorDefaultReactionsSO asset and the attractor fires it over the burst source / target — no code at the call site.
PlayAmbient — continuous shimmer on small element
public UIRenderHandle PlayAmbient(
    VisualElement target,
    GameObject prefab,
    float size = 160f,
    OverlayAnchor anchor = OverlayAnchor.Center,
    Vector2 offset = default);
Continuous looping overlay sized in pixels, allowed to spill outside the target's bounds (sets target overflow to Visible for the overlay's lifetime). Use for burst-shaped continuous effects on small elements like icons or podiums where the particle envelope is larger than the host. Auto-releases when target detaches from the panel (tab change, modal close, screen pop).
// On a "gift" icon — shimmer the icon continuously while the tab is mounted:
UIRenderManager.Instance.PlayAmbient(giftIcon, _ambientShimmerPrefab, size: 96f);
PlayAmbientFill — exact-fit shimmer
public UIRenderHandle PlayAmbientFill(VisualElement target, GameObject prefab);Continuous looping overlay that exactly fills target's box — 100% width/height, no overflow mutation, no spillover. Use for surface-shimmer effects on elements that own their own clipping (rounded corners, gradients) and shouldn't have their layout/overflow disturbed. Auto-releases on detach.
// On a leaderboard podium — fill with rank-specific sparkles:
UIRenderManager.Instance.PlayAmbientFill(podium1, _goldSparklesPrefab);
UIRenderManager.Instance.PlayAmbientFill(podium2, _silverSparklesPrefab);
UIRenderManager.Instance.PlayAmbientFill(podium3, _bronzeSparklesPrefab);
PlayAmbientBottomBand — bottom-edge band
public UIRenderHandle PlayAmbientBottomBand(
    VisualElement target,
    GameObject prefab,
    float heightPx = 40f);
Continuous looping overlay pinned to the bottom edge of target, spanning the target's full width. Use for "rising particle" effects (sparkles, embers, confetti) where the emitter should originate at the bottom edge and drift upward through the host. heightPx controls how tall the emitter band is — small values (≤ target height / 3) keep emission near the edge; larger values bleed the spawn area upward into the host. Auto-releases on detach.
Auto-release-on-detach pattern
PlayAmbient, PlayAmbientFill, and PlayAmbientBottomBand all share a DetachFromPanelEvent hook that calls handle.Release() when target leaves the panel. You don't need to track handles or call Release yourself — the overlay cleans up as soon as the target screen is unmounted.
The hook is a one-shot DetachFromPanelEvent callback on the target — the first time the target detaches from its panel (including re-parenting, which detaches transiently), the handle is released.
For one-shot bursts, PlayBurst instead uses auto-release: true with a 5-second timeout — Unity's pool returns the slot when the ParticleSystem reports "no living particles" or the timeout expires, whichever comes first.
No-Code Components
Luna provides two MonoBehaviour components that expose the UIRender system in the Inspector — no C# required. They follow the same target-resolution pattern as TransitionAnimator: assign a UIViewComponent or PanelRenderer, specify an element name, and choose when to activate.
UIRenderActivator
Renders 3D content into a UI element's background. Supports three activation modes:
| Mode | Description |
|---|---|
Play | Instantiates a prefab clone into a render slot |
PlayInstance | Reparents an existing scene GameObject into a render slot (borrowed) |
Observe | Watches a scene GameObject in-place without moving it |
Inspector Properties
| Property | Description |
|---|---|
| Content | The GameObject to render (prefab for Play, scene instance for PlayInstance/Observe) |
| Mode | UIRenderActivationMode — Play, PlayInstance, or Observe |
| Render Settings | Embedded UIRenderSettings (resolution, camera, auto-release, etc.) |
| UI View Component | Optional. Resolves the target element from a UIView hierarchy |
| Panel Renderer | PanelRenderer reference, used when no UIViewComponent is set. Leave empty to auto-discover one on this GameObject or its parents |
| Element Name | Name of the target VisualElement. Leave empty for root |
| Fade Trigger | Which UIView fade event triggers activation (visible when UIViewComponent is set) |
| Activate On Enable | Auto-activate when the component is enabled (visible when no UIViewComponent) |
| Release On Disable | Auto-release when the component is disabled |
| On Activated / On Released | UnityEvent callbacks |
Code API
UIRenderActivator activator = GetComponent<UIRenderActivator>();

// Activate on configured target
activator.Activate();

// Activate on a specific element
activator.Activate(myVisualElement);

// Re-instantiate content in the same slot
activator.Replay();

// Release the handle
activator.Release();

// Check state
bool active = activator.IsActive;
UIRenderHandle handle = activator.Handle;
UIOverlayActivator
Renders 3D content as a transparent overlay on top of a UI element — ideal for fire-and-forget VFX like particle bursts on buttons or cards.
Inspector Properties
| Property | Description |
|---|---|
| Content | The GameObject to render |
| Use Instance | When true, uses PlayOverlayInstance (borrow). When false, uses PlayOverlay (clone) |
| Render Settings | Embedded UIRenderSettings |
| Overlay Settings | Embedded SerializedOverlaySettings — anchor, size unit (Percent/Pixel), width, height, offsets, aspect ratio, overflow |
| UI View Component | Optional UIView target resolution |
| Panel Renderer | PanelRenderer reference, used when no UIViewComponent is set; auto-discovered from this GameObject or parents when empty |
| Element Name | Target element name |
| Fade Trigger | UIView fade event trigger |
| Play On Enable | Auto-play when enabled |
| Release On Disable | Auto-release when disabled |
| On Activated / On Released | UnityEvent callbacks |
Code API
UIOverlayActivator overlay = GetComponent<UIOverlayActivator>();

// Play on configured target
overlay.Play();

// Play on a specific element
overlay.Play(myVisualElement);

// Re-instantiate content in the same overlay slot
overlay.Replay();

// Release the overlay
overlay.Release();

// Check state
bool active = overlay.IsActive;
UIRenderHandle handle = overlay.Handle;
Target Resolution
Both components resolve the target VisualElement using the same priority chain:
- UIViewComponent → uses
ParentElement, then queries by element name - PanelRenderer → uses the visual tree delivered by the renderer's reload callback, then queries by element name
- GetComponent / GetComponentInParent → auto-discovers a PanelRenderer on the same GameObject or parents
PanelRenderer delivers its visual tree asynchronously. On the PanelRenderer path, the component registers a reload callback (RegisterUIReloadCallback) on the resolved renderer and caches the delivered root; the callback fires immediately on registration if the panel is already mounted. If you call Activate() / Play() before the tree has been delivered, the component logs a warning and does nothing — retry after the panel mounts, or drive activation from a UIView fade trigger.
When a UIViewComponent is assigned, the Fade Trigger field appears and Activate On Enable / Panel Renderer are hidden — activation is driven by UIView lifecycle events instead.
UIRenderSettings
Per-request configuration for the render system. Use the Builder for fluent creation or serialize directly in the Inspector.
Builder API
UIRenderSettings settings = new UIRenderSettings.Builder()
    .WithResolution(512, 512)
    .WithCameraMode(UIRenderCameraMode.Perspective)
    .WithCameraSize(60f)
    .WithCameraDistance(3f)
    .WithCameraBackgroundColor(Color.clear)
    .WithAutoRelease(true)
    .WithAutoReleaseTimeout(5f)
    .WithAntiAliasing(4)
    .WithHDR(true)
    .WithRenderMode(UIRenderMode.Continuous)
    .WithAutoFrame(true)
    .WithAutoFramePadding(1.2f)
    .WithCameraOffset(Vector3.zero)
    .WithCameraRotation(new Vector3(15f, 30f, 0f))
    .WithDebug(true)
    .Build();
Modify Existing Settings
UIRenderSettings modified = existingSettings.ToBuilder()
    .WithResolution(1024, 1024)
    .WithAutoFrame(true)
    .Build();
Settings Reference
| Property | Type | Default | Description |
|---|---|---|---|
Resolution | Vector2Int | 256×256 | RenderTexture dimensions in pixels |
CameraMode | UIRenderCameraMode | Perspective | Camera projection mode |
CameraSize | float | 60 | Orthographic size or field of view |
CameraDistance | float | 3 | Distance from content to camera |
CameraBackgroundColor | Color | clear | Camera background. Use Color.clear for transparent |
Depth | int | 16 | RenderTexture depth buffer bits (0, 16, 24, 32) |
AutoRelease | bool | true | Auto-return slot to pool when content finishes |
AutoReleaseTimeout | float | 0 | Fallback timeout in seconds. 0 = no timeout |
Layer | int | -1 | Layer for render isolation. -1 uses manager default |
AntiAliasing | int | 1 | MSAA sample count (1, 2, 4, 8) |
HDR | bool | false | Use HDR RenderTexture format |
RenderMode | UIRenderMode | Continuous | Camera update mode |
AutoFrame | bool | false | Auto-frame camera to fit content bounds |
AutoFramePadding | float | 1.2 | Extra padding for auto-framing (1.0 = tight) |
CameraOffset | Vector3 | zero | Offset applied to camera look-at target. When used with AutoFrame, the offset is applied after bounds are calculated — shifting the framing center without affecting bounds computation |
CameraRotation | Vector3 | zero | Euler angles for camera orbit around content |
Debug | bool | false | Emit debug logs during activation and framing |
ContentMode | UIRenderContentMode | PrefabContentMode | Strategy for content activation/deactivation |
Render Modes
| Mode | Description |
|---|---|
Continuous | Camera renders every frame |
Once | Camera renders a single frame then disables. RT retains the image |
Manual | Camera only renders when handle.Render() is called |
UIRenderHandle
The caller-facing handle returned by all activation methods. Controls the lifecycle of a single render instance.
Properties
bool IsActive           // Whether the handle is currently active and rendering
RenderTexture RenderTexture  // The active RenderTexture being written to
UIRenderSettings Settings    // The settings used for this render instance
Lifecycle Methods
// Stop all effects. Auto-releases when effects drain.
// If no trackable effects exist, releases immediately.
handle.Stop();

// Immediately release the handle and return the slot to pool.
handle.Release();

// Toggle auto-release at runtime
handle.SetAutoRelease(true);
Replay
Re-instantiates the content in the same render slot without returning it to the pool. The overlay element (if any) is preserved. Useful for restarting particle effects or VFX without pool churn.
// Restart the effect in the same slot
handle.Replay();
Note:
Replay()requires the handle to still be active. It destroys the current content, re-instantiates from the original source, and reapplies the RenderTexture to the target element.
Camera Controls
// Auto-frame camera to fit content bounds
handle.FrameContent(padding: 1.2f, offset: Vector3.zero);

// Runtime camera adjustments
handle.SetCameraDistance(5f);
handle.SetCameraSize(45f);
handle.SetCameraLocalPosition(new Vector3(0, 1, -3));
handle.SetCameraLocalRotation(Quaternion.Euler(15, 30, 0));

// Runtime content adjustments
handle.SetContentLocalPosition(Vector3.zero);
handle.SetContentLocalRotation(Quaternion.identity);

// Manual render (only for UIRenderMode.Manual)
handle.Render();
Events
// Fired when the handle is released and the slot returns to pool
handle.OnReleased += () => Debug.Log("Released!");
Debug Methods
// Save current RenderTexture to PNG (Editor/Development builds only)
handle.DebugSaveRT("debug_output.png");

// Log detailed info about camera, content, bounds, and RT
handle.DebugLogInfo();
IDisposable
UIRenderHandle implements IDisposable for use in using blocks:
using (UIRenderHandle handle = renderElement.Play(prefab))
{
    // handle is released when scope exits
}
RenderElement
Custom VisualElement designed for 3D rendering. Provides UXML attributes for render resolution and convenience methods.
UXML Usage
<CupkekGames.Luna.RenderElement
  name="MyRender"
  RenderWidth="512"
  RenderHeight="512"
  style="width: 100%; flex-grow: 1;" />
UXML Attributes
| Attribute | Type | Default | Description |
|---|---|---|---|
RenderWidth | int | 256 | RenderTexture width in pixels |
RenderHeight | int | 256 | RenderTexture height in pixels |
Convenience Methods
RenderElement element = root.Q<RenderElement>("MyRender");

// Play a prefab
UIRenderHandle handle = element.Play(prefab, settings);

// Play an existing scene instance
UIRenderHandle handle = element.PlayInstance(instance, settings);

// Observe a scene object in-place
UIRenderHandle handle = element.Observe(target, settings);

// Play an overlay effect (independent of main handle)
UIRenderHandle overlayHandle = element.PlayOverlay(effectPrefab, settings, overlaySettings);

// Activate with settings-defined content mode
UIRenderHandle handle = element.Activate(content, settings);

// Stop / Release
element.Stop();
element.Release();

// Frame content
element.FrameContent(1.2f);

// Access current handle
UIRenderHandle current = element.CurrentHandle;
When a RenderElement is detached from the panel (removed from the visual tree), it automatically releases any active handle.
UIRenderManager
Singleton manager that owns the render slot pool. Add this to a GameObject in your scene.
Inspector Properties
| Property | Type | Default | Description |
|---|---|---|---|
Default Layer | int | 31 | Layer index for render isolation |
Default Capacity | int | 3 | Initial number of pre-created slots |
Max Capacity | int | 10 | Maximum pool size |
Prewarm | bool | true | Pre-create slots on Awake |
❗ Important — keep a
LunaUIManagerin the scene.UIRenderManager's per-frame upkeep (observe-mode camera follow, auto-release when effects finish, auto-release timeouts) runs inUIRenderManager.Tick(float), which is called byLunaUIManager.Update. Without aLunaUIManageralongsideUIRenderManager, slots never auto-release.
Layer Setup
The render system requires a dedicated Unity layer to isolate render slot cameras from the main scene:
- Open Edit > Project Settings > Tags and Layers
- Assign a name to the layer configured in
Default Layer(e.g. layer 31 →UIRender) - Ensure your main camera's culling mask excludes this layer
⚠️ URP / HDRP: include the UIRender layer in the renderer's layer mask. On the Universal Render Pipeline (URP) or HD Render Pipeline (HDRP) you must also add the UIRender layer to the Filtering > Opaque/Transparent Layer Mask of your active Universal Renderer Data (or Custom Pass volume for HDRP). The slot cameras render content on this layer — if the renderer asset excludes it, nothing appears in the RenderTexture even though the camera and layer are configured correctly.
Effect Handlers
The system uses pluggable effect handlers to track content lifecycle (e.g. when particles finish). Built-in handlers:
| Handler | Tracks | Condition Define |
|---|---|---|
ParticleEffectHandler | ParticleSystem | Always available |
VFXEffectHandler | VisualEffect (VFX Graph) | UNITY_VFX |
Custom Effect Handlers
Extend UIRenderEffectHandler and register via the static factory:
public class MyCustomEffectHandler : UIRenderEffectHandler
{
    private MyComponent _myComponent;

    // Whether this handler cached anything from the current content
    public override bool HasComponents => _myComponent != null;

    // Called once on activation — cache relevant components
    public override void CacheComponents(GameObject target)
    {
        _myComponent = target.GetComponentInChildren<MyComponent>();
    }

    // Return true while the effect is still running
    public override bool IsAlive()
    {
        return _myComponent != null && _myComponent.IsPlaying;
    }

    // Stop all cached effects gracefully
    public override void Stop()
    {
        _myComponent?.StopPlaying();
    }

    // Clear cached references when the slot is released
    public override void Clear()
    {
        _myComponent = null;
    }
}

// Register at startup
UIRenderEffectHandler.Register(() => new MyCustomEffectHandler());
Example: Particle Effect on UI Icon
PanelRenderer delivers its visual tree asynchronously — query elements inside the reload callback, not in Awake/Start:
public class GoldIconEffect : MonoBehaviour
{
    [SerializeField] private PanelRenderer _panelRenderer;
    [SerializeField] private GameObject _starDustPrefab;

    private UIRenderHandle _overlayHandle;

    void Awake()
    {
        _panelRenderer.RegisterUIReloadCallback(OnUIReload);
    }

    private void OnUIReload(PanelRenderer renderer, VisualElement root, int version)
    {
        // PanelRenderer can rebuild its tree (enable cycles) — release
        // the old handle before playing on the fresh elements.
        _overlayHandle?.Release();

        VisualElement goldIcon = root.Q("GoldIcon");

        // Play star dust overlay — gold icon stays visible underneath
        _overlayHandle = UIRenderManager.Instance.PlayOverlay(_starDustPrefab, goldIcon);
    }

    void OnDestroy()
    {
        _panelRenderer.UnregisterUIReloadCallback(OnUIReload);
        _overlayHandle?.Release();
    }
}
Example: 3D Character Preview
public class CharacterPreview : MonoBehaviour
{
    [SerializeField] private PanelRenderer _panelRenderer;
    [SerializeField] private GameObject _characterPrefab;

    void Awake()
    {
        _panelRenderer.RegisterUIReloadCallback(OnUIReload);
    }

    void OnDestroy()
    {
        _panelRenderer.UnregisterUIReloadCallback(OnUIReload);
    }

    private void OnUIReload(PanelRenderer renderer, VisualElement root, int version)
    {
        RenderElement preview = root.Q<RenderElement>("CharacterPreview");

        UIRenderSettings settings = new UIRenderSettings.Builder()
            .WithResolution(1024, 1024)
            .WithCameraMode(UIRenderCameraMode.Perspective)
            .WithCameraDistance(2.5f)
            .WithCameraRotation(new Vector3(10f, 180f, 0f))
            .WithAutoFrame(true)
            .WithAntiAliasing(4)
            .WithAutoRelease(false) // Keep rendering until manually released
            .Build();

        UIRenderHandle handle = preview.Play(_characterPrefab, settings);
    }
}
Demo Scenes
The Showcase sample includes two demo scenes (under Components/UIRender/):
- UIRenderDemoCharacters.unity: Demonstrates all four content modes (Prefab, Instance, Generic, Observe) with interactive controls for Play, Stop, Replay, Release, Frame, and Debug
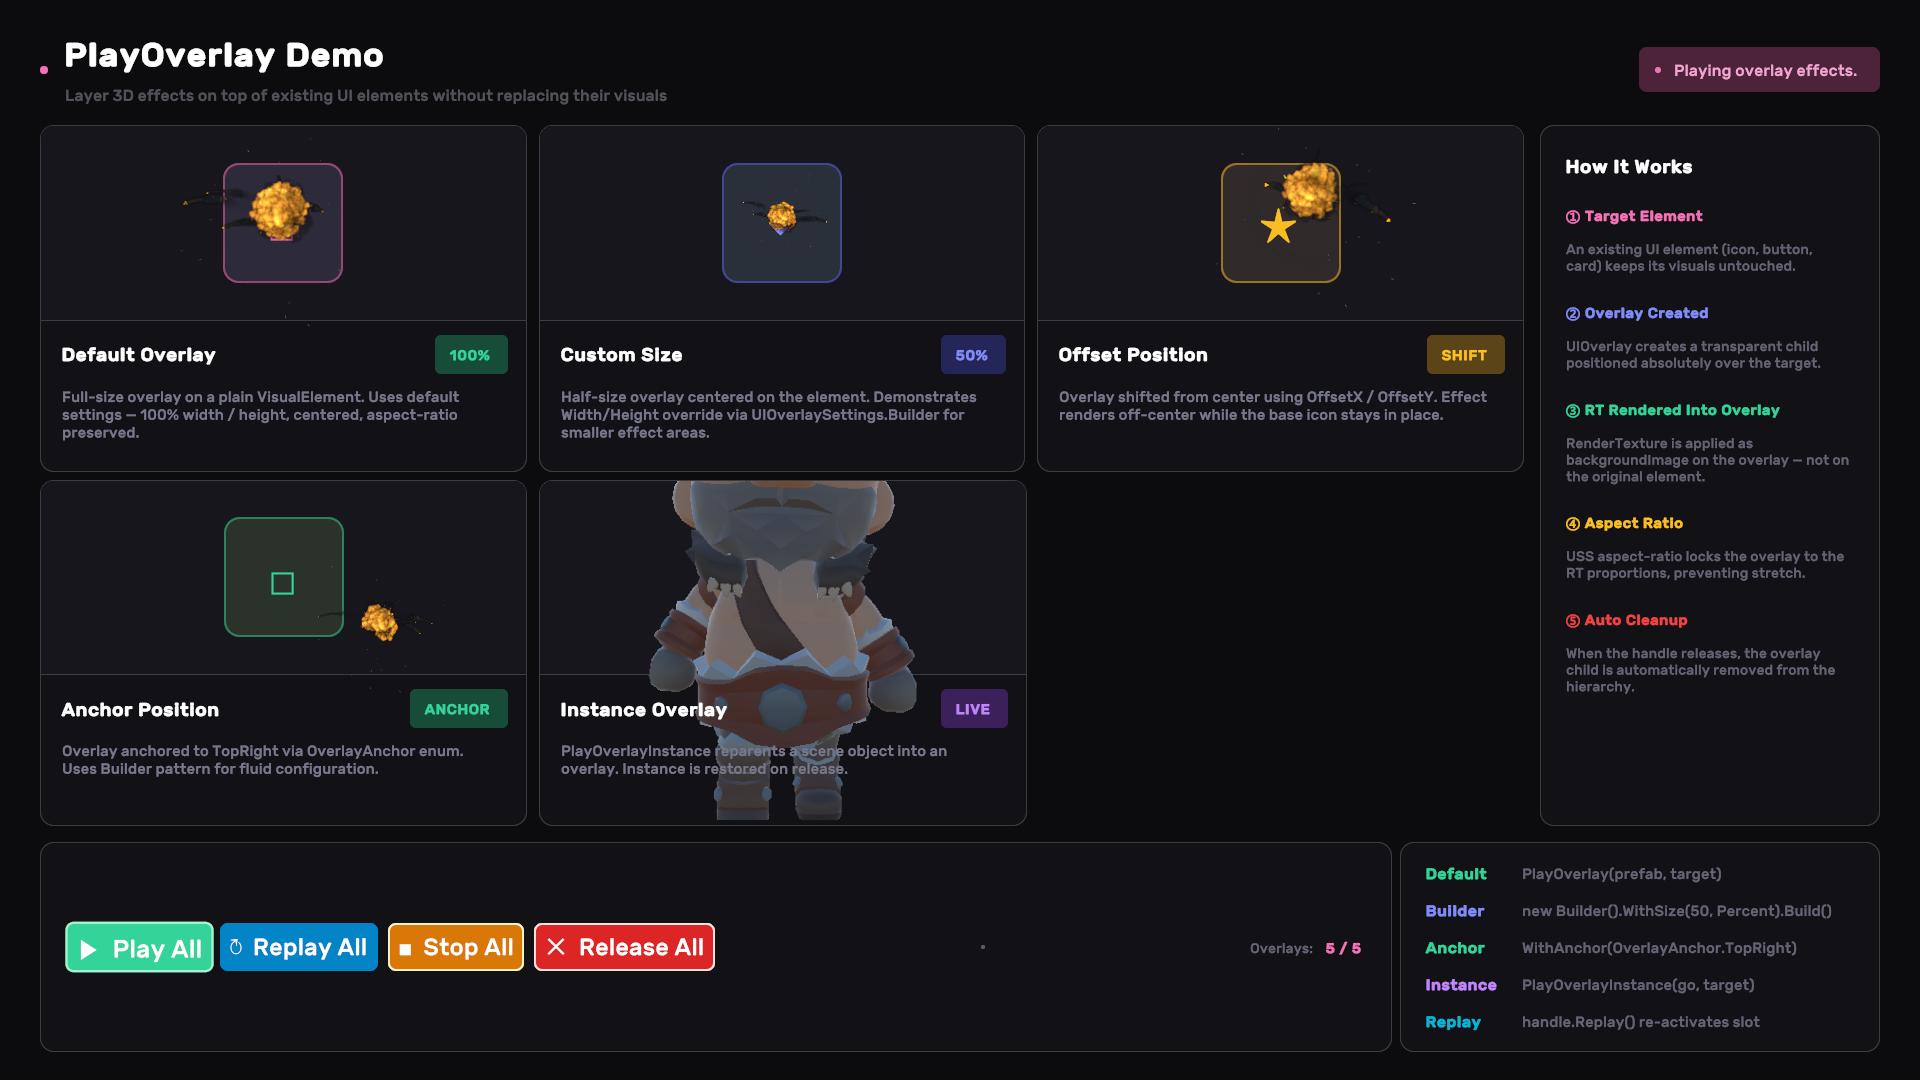
- UIRenderDemoOverlay.unity: Showcases the PlayOverlay feature with five configurations — default full-size overlay, custom 50% size, offset position, anchored overlay (TopRight with overflow visible), and an instance overlay using
PlayOverlayInstance. Includes a Replay All button to re-trigger all overlays.
Import the Showcase sample to explore these demos.
See also
- UI Attractor — fly-to coin/gem bursts as pure pooled VisualElements, for when you don't need GPU particles or cameras at all.
- Transition Animation — fire UIRender overlays mid-sequence via
PlayOverlaynodes, no callback plumbing. - Coordinate Utilities — screen ↔ world conversion when UI and 3D need to line up.
UI Render ships with Luna — get it on the Asset Store.
Settings
Theme
Light
Contrast
Material
Dark
Dim
Material Dark
System
Sidebar(Light & Contrast only)
Font Family
DM Sans
Wix
Inclusive Sans
AR One Sans
Direction